
There is nothing quite like the perfume of a ripe Feijoa in late autumn here in San Diego. If you have walked past my orchard when the fruit is dropping, you know that sweet, pineapple-mint aroma hits you before you even see the tree. But sometimes, life happens.
You planted that Acca sellowiana—commonly known as Pineapple Guava or Guavasteen—in a spot that looked perfect three years ago, but now the garage addition is shading it out, or you are moving to a new property and cannot bear to leave your prize producer behind. This brings us to the big question I get asked constantly: Can you actually transplant a Feijoa tree without killing it?

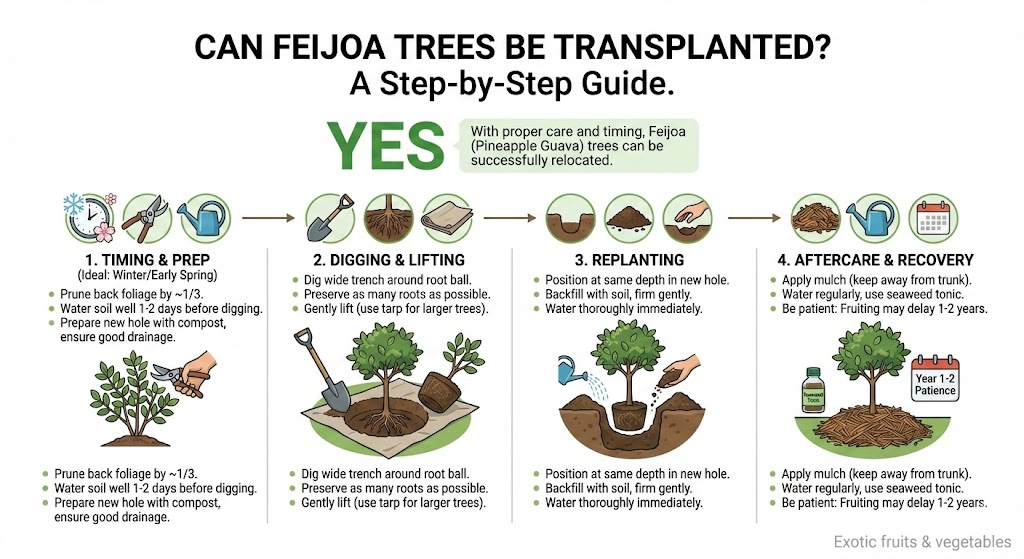
Here at Exotic Fruits and Vegetables, we’ve found that the difference between a dead stick and a thriving transplanted tree usually comes down to preparation done months before the shovel even hits the soil. We are going to walk through the biology of why this is difficult, the exact steps to take, and the hard numbers on survival rates based on tree age.
Understanding the Feijoa Root System
To move a plant successfully, you have to understand what is happening underground. The Feijoa develops a fibrous root system near the surface that loves to spread out, but it also sends down a taproot-like structure for stability and deep moisture access. When you sever these roots, you cut off the pipeline that supplies water to the leaves. Since Feijoas are evergreen, they do not have a true “off” switch where they drop all leaves and sleep deeply, meaning they demand moisture constantly.
Think of the root system like a complex highway interchange. The small feeder roots are the surface streets bringing in daily supplies, while the deep roots are the interstate hauling heavy cargo. When you transplant, you are essentially bulldozing the interstate and expecting the surface streets to handle all the traffic immediately.
I learned this lesson the hard way six years ago. I tried to move a six-foot Feijoa in July because I needed space for a new greenhouse. I dug a tight circle around the trunk, severed the roots, and dragged it twenty feet away. Despite watering it daily, the leaves turned crispy brown within 48 hours. I killed a tree that had produced 15 pounds of fruit the previous season because I ignored the physiology of the plant.

The Critical Window: When to Dig
Timing is not just a suggestion; it is the primary factor in survival. In San Diego and similar zones (8-10), you never want to transplant during the active growth flush or fruit set. The tree is expending massive energy to produce new wood or ripen fruit, leaving zero reserves for root regeneration.
The absolute best time to move a Feijoa is late winter or very early spring, just before the new bud break. In our local climate, this usually means late February to early March. The soil temperature is cool but warming—around 50-60°F—which encourages root growth without the stress of scorching air temperatures drying out the foliage.
Never attempt to transplant a Feijoa when daytime temperatures exceed 75°F. The rate of transpiration—water evaporating from the leaves—will outpace the damaged roots’ ability to uptake water, leading to rapid desiccation and death.
Step-by-Step Transplanting Protocol
If you are committed to moving your tree, follow this protocol. This is the exact method I use on my farm, and it has bumped my survival rate from 50% to roughly 85% for established trees.
1. The Pre-Dig Preparation (Root Pruning)
If you have the luxury of time, start this process three months in advance. Take a sharp spade and cut a circle around the tree, severing the roots but leaving the tree in the ground. This technique, called root pruning, forces the tree to grow a dense mat of new feeder roots closer to the trunk. For a tree with a 2-inch caliper (trunk diameter), cut a circle 24 inches in diameter.
2. Hydration Loading
24 hours before the move, flood the soil around the tree. You want the soil to be moist enough to hold together in a ball, but not so muddy that it falls apart under its own weight. I apply about 10-15 gallons of water slowly to a medium-sized tree to ensure deep saturation.
3. The Excavation
Dig a trench outside your root pruning line. You want to preserve as much soil around the roots as possible. A general rule is to maintain 10 to 12 inches of root ball diameter for every 1 inch of trunk caliper. If your tree trunk is 3 inches thick, you are looking at a 30 to 36-inch root ball. That ball of soil can weigh upwards of 200 pounds, so call a friend or use a tractor.
Do not shake the soil off the roots to make the tree lighter. The native soil protects the microscopic root hairs responsible for water uptake. Exposing bare roots to the air for even 10 minutes can cause irreversible damage.
4. The New Home
Dig your new hole before you lift the tree. The hole should be twice the width of the root ball but no deeper. We want the tree to sit on firm, undisturbed soil so it does not sink later. Our experience at Exotic Fruits and Vegetables has shown that planting too deep is a leading cause of slow decline in Feijoas; the root flare must remain visible above the soil line.
5. Replanting and Amending
Slide the tree onto a tarp to drag it to the new location to keep the root ball intact. Place it in the hole. Do not fill the hole with potting soil or pure compost. You want to use the native soil you just dug out, mixed with about 20% organic compost or aged manure. This encourages roots to venture out into the native soil rather than staying in a “perfect” pocket of potting mix.
Post-Transplant Care: The Danger Zone
The first six weeks after transplanting are where the battle is won or lost. Your tree is in shock. It has lost 40-60% of its root mass. To compensate, I highly recommend pruning the canopy back by about 20-30%. This reduces the number of leaves the compromised root system needs to support.
- Watering: Water immediately after planting to settle the soil and remove air pockets. Going forward, check the soil moisture daily. Stick your finger 3 inches deep; if it is dry, water. I typically provide 5 gallons every 3 days for the first month, adjusting for rain.
- Shading: If a heat spike hits, rig up a temporary shade cloth structure. Reducing direct solar radiation relieves massive stress from the tree.
- Mulching: Apply a 3-4 inch layer of wood chips or straw starting 6 inches away from the trunk and extending to the drip line. This acts like a lid on a pot, keeping moisture in and regulating soil temperature.
- No Fertilizer: Do not fertilize a newly transplanted tree. The salts in fertilizers can burn the healing roots. Wait until you see vigorous new growth, usually 3-4 months later.
Use a liquid seaweed or kelp solution every two weeks after transplanting. Unlike nitrogen-heavy fertilizers, kelp contains hormones like cytokinins that specifically stimulate root development and help mitigate transplant shock.
Success Rates by Size and Age
Not all Feijoas are equal candidates for relocation. Younger trees are much more adaptable. I compiled this table based on my own orchard records and observations from fellow growers in the San Diego region.
| Tree Age | Trunk Caliper | Estimated Survival Rate | Fruit Production Impact |
|---|---|---|---|
| 1-2 Years | < 1 inch | 90-95% | Delays fruiting by 1 season |
| 3-5 Years | 1-2.5 inches | 60-75% | No fruit for 1-2 years |
| 5+ Years | > 3 inches | < 40% | Significant dieback likely; 3+ years to recover |
Ever wonder why the survival rate drops so drastically after year five? It is simply a matter of root mass volume. A mature tree has a root system that extends well beyond the drip line. It is physically impossible to capture enough of that system to support a large canopy without heavy machinery.
Signs of Trouble and How to Pivot
Even with perfect execution, your Feijoa might pout. Leaf drop is the most common symptom. If your tree drops its interior leaves but keeps the tips green, it is prioritizing survival. That is a good sign. If the leaves turn brown and stay attached to the branch, that is a bad sign—it means the tissue died so fast the tree couldn’t even form an abscission layer to drop the leaf.
I once rescued a neighbor’s 4-year-old Feijoa that had dropped 80% of its leaves after a move. We painted the trunk with white latex paint (diluted 50/50 with water) to prevent sunburn on the now-exposed bark and kept the soil strictly monitored. By the next spring, it pushed out a flush of red-tinged new growth that was one of the prettiest sights I’ve ever seen.
As fruit enthusiasts at Exotic Fruits and Vegetables, we often remind growers that patience is the only fertilizer that works in this situation. You might stare at a stick figure of a tree for six months. If the cambium layer (scratch the bark with your fingernail) is still green, there is hope.
Container Transplants: A Different Beast
Moving a Feijoa from a pot to the ground is significantly easier than ground-to-ground, but you still need to be careful. Often, nursery trees are root-bound, with roots circling the pot like a coiled snake. If you just plop that into the ground, the roots will continue to circle and eventually strangle the tree.
When planting from a container, you must aggressively tease the roots outward. I use a soil knife to slice vertical scores down the sides of the root ball and physically pull the roots loose. It feels brutal, almost like you are destroying the plant, but this violence is necessary to trigger the roots to grow outward into the native soil.
Have you ever pulled up a dead tree years later only to find the roots still shaped exactly like the pot it came in? That is the result of “gentle” planting. Don’t be gentle with pot-bound roots.
I have plenty of customers who ask if they can keep Feijoas in pots permanently. You can, but they will never reach the majesty of their ground-dwelling cousins. If you must move a container Feijoa to a larger pot, only go up one size (e.g., 5 gallon to 15 gallon). A massive volume of wet, empty soil around a small root ball can lead to anaerobic conditions and root rot.

Key Takeaways for Success
- Hydration is key: A dehydrated tree has almost zero chance of surviving the move.
- Preserve the soil: The microbiology in the native soil ball is the tree’s life support system.
- Reduce the load: Prune the top to match the loss of the bottom.
- Monitor moisture: Too much water rots the damaged roots; too little desiccates them.
Transplanting a Feijoa is a labor of love. It requires sweat, precision, and a willingness to accept that nature sometimes has other plans. However, when you successfully move a tree and taste that first gritty, sweet fruit from its new location, the effort feels entirely justified. If your tree is older than five years, I honestly recommend planting a new one instead of moving the old one; Feijoas grow fast, and a new planting will often overtake a shock-stunted transplant within three years. Good luck, and keep digging.


tried transplanting feijoa 2 yrs ago, failed miserably. what’s the deal with root system? can’t find clear info on how to prep
utilizing automated irrigation with Decagon Devices soil moisture sensors and a Davis Instruments weather station to monitor my feijoa trees. tracked a 25% increase in fruit production after optimizing watering schedule based on real-time data. anyone else using similar tech to improve yields?